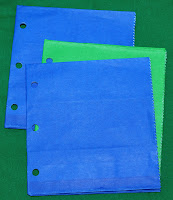
These simple, cute, cheap, bag books with optional pockets, can be used as a mini journal, storybook, mini scrapbook, mini photo album to document your summer fun and more. So collect your scrap papers, some photographs, scissors, glue, ribbon/string/binder rings and get started.
I did not originate this idea and there are many was to create this project. I'm only going to show you how "I" did it. For more ideas on this and many other great projects, surf on over to YouTube and search the videos for "Paper Bag Scrapbook" and SOOOO much more!
If you do this project, please post your pic(s) and list your link in the comments so others can see your design and it can inspire some new or unique ideas and techniques.
INSTRUCTIONS:
Stuff You'll Need
+ paper lunch bags (3-6), any color -- they're not just for lunch anymore!
+ decorative paper, loose leaf, etc.
+ glue
+ scissors
+ hole punch
+ yarn, ribbon, or rings
+ stuff: stickers, rubber stamps, markers, photos, etc.
Step 1 - Fold each paper bag individually in half BEFORE you punch the holes. Stack them to the open sides are on the bottom, with the fold on your left, which is where you will bind your book.
Step 2 - Stack your bags on top of each other and evenly punch three (or more) holes in the stack, on the left fold.
Step 3 (optional) - Cut a strip of scrap paper about 2 inches wide and the length of your bag (approx 5"). BEFORE you punch the holes, fold evenly over the binding edge of the bag (the folded side) and glue into place, then punch your holes.
 I usually only do this for the front and back cover (because I'm lazy, mostly), but you can do this for every page if you want, to reinforce you holes. I use YES! glue. It's a bit thick and is applied with a brush (or your finger when you don't want to gunk up your good brushes or when the dog took off with your glue brush and ate it into a furry stub). It won't wrinkle your paper.
Step 4 - Cut some squares of colored or decorative paper and glue onto the bag on each page. This will strengthen your pages and it looks cute if you want to create a "theme" based mini book (bugs, beaches, etc.).
Step 5 - Cut ribbons in 7"-9" pieces stack your pages on top of each other and thread through each hole and tie in a double knot. You can mix and match ribbons, use rings, etc. **Don't tie the ribbon too tight, you want to be able to open the pages and have them lay flat for decorating and writing.
Step 6 - I put a tab of the inside of the pocket(s) for fun. The pockets can be used to hold extra photos, cards, coupons, invitations, tickets, or what ever corresponds with the page content/theme. If you don't want the pockets, glue them together. You can add a small circle of VELCRO to keep them closed individually, or add a ribbon tie on the front and back cover to keep the whole book closed upon completion.
Step 7 - Add your background papers to the inside pages. You can piece scraps of paper, fabric, or anything flat that you can glue down.
I also decorate inside and outside of the flap to write secret notes or a small token. You can also glue your background page over the flap if you don't want to use it.
Step 8 - You are now ready to personalize and decorate your book. Use colorful paper, buttons, stickers, ribbons, rubber stamps, and photographs. Be creative and keep it as simple or elaborate as you wish.
(The book to the left is one I made using plain brown lunch bags.)
Tips:
Keep most of the decorations to the corners and edges to allow your pictures to lay flat.
Make a blank book for a friend as a gift or as an activity for a sleep over, birthday party, or play date.
Great for collecting souvenirs, a brag books for grandparents, teacher gifts, scrapbook clubs for children and adults.
Warning:
This book is not meant to last two hundred years. If you want to create an archival quality book I suggest investing in acid-free supplies (the bags are not acid-free but can be treated to be) and heavy-duty supplies.
Have fun!!!


