Wednesday, July 7, 2010

Fun & Quick Summer Project for Kids

Here's a fun and quick project idea that you can share with your children this summer.  I wanted to so something with my child and give him the opportunity to be creative and constructive at the same time.  They also make great gifts for adults and children!!

These simple, cute, cheap, bag books with optional pockets, can be used as a mini journal, storybook, mini scrapbook, mini photo album to document your summer fun and more. So collect your scrap papers, some photographs, scissors, glue, ribbon/string/binder rings and get started.

I did not originate this idea and there are many was to create this project. I'm only going to show you how "I" did it.  For more ideas on this and many other great projects, surf on over to YouTube and search the videos for "Paper Bag Scrapbook" and SOOOO much more!

If you do this project, please post your pic(s) and list your link in the comments so others can see your design and it can inspire some new or unique ideas and techniques.

INSTRUCTIONS:

Stuff You'll Need
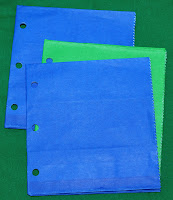
    + paper lunch bags (3-6), any color -- they're not just for lunch anymore!
    + decorative paper, loose leaf, etc.
    + glue
    + scissors
    + hole punch
    + yarn, ribbon, or rings
    + stuff: stickers, rubber stamps, markers, photos, etc.


Step 1 - Fold each paper bag individually in half BEFORE you punch the holes. Stack them to the open sides are on the bottom, with the fold on your left, which is where you will bind your book.


Step 2 - Stack your bags on top of each other and evenly punch three (or more) holes in the stack, on the left fold.


Step 3 (optional) - Cut a strip of scrap paper about 2 inches wide and the length of your bag (approx 5"). BEFORE you punch the holes, fold evenly over the binding edge of the bag (the folded side) and glue into place, then punch your holes. 

 I usually only do this for the front and back cover (because I'm lazy, mostly), but you can do this for every page if you want, to reinforce you holes.  I use YES! glue.  It's a bit thick and is applied with a brush (or your finger when you don't want to gunk up your good brushes or  when the dog took off with your glue brush and ate it into a furry stub). It won't wrinkle your paper.

Step 4 - Cut some squares of colored or decorative paper and glue onto the bag on each page.  This will strengthen your pages and it looks cute if you want to create a "theme" based mini book (bugs, beaches, etc.).


Step 5 - Cut ribbons in 7"-9" pieces stack your pages on top of each other and thread through each hole and tie in a double knot. You can mix and match ribbons, use rings, etc.  **Don't tie the ribbon too tight, you want to be able to open the pages and have them lay flat for decorating and writing. 


Step 6 - I put a tab of the inside of the pocket(s) for fun. The pockets can be used to hold extra photos, cards, coupons, invitations, tickets, or what ever corresponds with the page content/theme. If you don't want the pockets, glue them together.  You can add a small circle of VELCRO to keep them closed individually, or add a ribbon tie on the front and back cover to keep the whole book closed upon completion.


Step 7 - Add your background papers to the inside pages. You can piece scraps of paper, fabric, or anything flat that you can glue down.


I also decorate inside and outside of the flap to write secret notes or a small token.  You can also glue your background page over the flap if you don't want to use it.

Step 8 - You are now ready to personalize and decorate your book.  Use colorful paper, buttons, stickers, ribbons, rubber stamps, and photographs. Be creative and keep it as simple or elaborate as you wish.

(The book to the left is one I made using plain brown lunch bags.)


Tips:

Keep most of the decorations to the corners and edges to allow your pictures to lay flat.

Make a blank book for a friend as a gift or as an activity for a sleep over, birthday party, or play date.

Great for collecting souvenirs, a brag books for grandparents, teacher gifts, scrapbook clubs for children and adults.

Warning: 

This book is not meant to last two hundred years. If you want to create an archival quality book I suggest investing in acid-free supplies (the bags are not acid-free but can be treated to be) and heavy-duty supplies.


Have fun!!!

E2B4CA73644DBF4E4B41D3B20469BCE7

Saturday, July 3, 2010

Something Special from the Heart

The beautiful child in this photo is Gabby, one of my incredible third grade student who passed away on Good Friday of this year after a brave battle against Neuroblastoma.  

You can read about her courageous life and the inspiring, spiritual, journey of her family at http://www.caringbridge.org/visit/gabriellechiasson.

This family continues to inspire faith and awe in the power of love in our community. It would be awesome if you would consider making a donation to the great organizations mentioned on the site in her name.

Now, back to the necklace.. Gabby has two sweet sisters that I also teach and love.  When she passed away I felt the desire to create something special for the girls.  Since one of my passions is making jewelry, I wanted to give them a piece that when they wore it, they would feel close to Gabby.

I have been making photo jewelry for a few years now, but recently tried a new UV resin by Lisa Pavelka called Magic Glos and fell in love with it. I knew it would stand the test of time and two active girls.

I created the pendants with a not-the-clearest photo I printed from the web (I didn't want to impose on the family at such a sensitive time for a clearer image), but was pleased with the results. Then, I attached the pendant to a delicate seed-beaded coated wire/string.  The girls loved them!

However, literally within minutes, my precious second-grader returned to my classroom with the necklace broken in two places.  (I think she was pulling on it to look at the picture of her sister, but the length was not long enough for it, causing it to break.)  So... I took it home and changed a couple of the findings and cemented the things I could to strengthen it. I wanted to get it back to her as quickly as possible. I thought that would do it. (Here I go "thinking" again.)

Well that repair lasted about a month, and on the last day of school, I returned to my desk and discovered a plastic baggie with the necklace in it. How heart broken that made me!!  I felt so bad (and embarrassed) that this thing kept coming apart on her.  If give someone a gift and the darn thing keeps breaking, you feel really crappy and that you let them down. It was beyond disappointing for the both of us.  But that sweet brave girl just keeps smiling!!!

To present day... that necklace has been sitting in my studio for the past 4-weeks. I wasn't quite sure how I could put it back together and make it strong enough to withstand this spunky, active young girl. Starring at this thing for weeks without a solution was driving me nuts. I want it to be strong, but still be feminine. I wanted her to be able to pull it up to look at her sister when she wanted to without fear of having it fall apart (again) in her hands.  What to do?

While cruising the art store, I purchased a "ball" chain knowing it's really strong.  I had concerns because it wasn't a "delicate" look. The length is longer so she can now look down at it and see her sister sitting close to her heart.  But still, the metal looked cold and sort of "boyish" to me.  Then today, I was sorting out some ribbon and VIOLA, I came up with what you see above.  The ribbon softens the look of the hard chain and is fitting for a young girl, don't you think?  The ends of the ribbons are secured from fraying with another product I use a lot on fabric called Fray Check; it's really cheap and works and looks so much better than clear nail polish--trust me :)

What's left now, is to get this thing mailed out to her ASAP.  I really hope she likes the changes, especially since it is styled completely different.  I figure if she doesn't care for the ribbons she can always cut them off.  And if she wants the beads again, I can always restring the original and hope for the best.

I am open to any other ides or suggestions you may want to share.  How do you "kid-proof" a necklace?
♡♡Please keep Gabby and her family in your prayers. They are truly remarkable, faith-filled, and inspiring!♡♡
Te Amo',
Tena

Please Note:  I do not get any type of compensation from endorsing the products mentioned on my blog (that would be nice, though), and am only supplying the product information in the event you would like to create something along the same lines for yourself.

HAPPY B-DAY AMERICA
Have a fun and safe 4th of July!!!!!!

Monday, June 28, 2010

Beach Memories (pre oil spill nightmare)


Hi everyone.  I hope you are enjoying your summer. We start back to school in a little over 4-weeks.  It sure is flying by.

Since we choose to cancel our Gulf Coast beach vacay this year, I wanted to remember our last trip that was filled with fun, sun, & memories. It greatly saddens me to think it might not be safe to bring my child back to the beach for many years.  While I am not a sun goddess by any stretch (my auto immune issues prevent this), I love the sound and smell of the water.

I love watching my son discover and catch the many small creatures living in the sand and water.
I love watching his pride as he releases these small animals back to their watery home.
I love the laughter after a big wave has just swept him off his feet.
I love watching him win ALL the boogie board races against his dad.

Little toes in the sand--there's nothing sweeter.

The wave sneaking up behind him caught him off guard and off of his feet.


Silly, Silly, boy!
The boy can't keep a straight face for nothing - I love that about him!
One of my favorite shots of the day!  Just soaking it all in.

Just seconds before the wave washed his hard work away.
Bye-Bye beach, until......

I read that it takes 3 large bottles of Dawn to clean just one pelican--THREE!!  I am going to find an organization I can donate some Dawn to!

Have you canceled your plans to visit the Gulf Coast beaches this summer? Where are you going instead?  Do tell!

Tena

LinkWithin

Related Posts with Thumbnails